Overview
Welcome to my portfolio page. This document seeks to highlight my role and contributions made to the project.
NUSSU-Connect is a Java desktop application that manages NUS Student Union’s HR and club finances. It enables you, as a committee member, to reduce your daily workload. It helps the organisation to minimize manpower and logistics issues during peak periods of activity by providing them a convenient platform to manage recruitment, contacts, budgets and projects efficiently.It can also be used by every organisation with various departments, and a clearly defined hierarchy of roles and responsibilities of each and every member belonging to the organisation.
NUSSU-Connect aims to digitise any company’s or organisation’s standard operating procedures, through the process of streamlining workflow, to essentially solve, or at least minimize, any manpower and logistics issues that can happen during any peak periods of business activities.
You can interact with NUSSU-Connect by issuing commands to the system via the command line interface (CLI). It uses JavaFX to create graphical user interfaces (GUI) which you are able to easily interact with using a mouse. The table below describes my team members and their features.
| Author | Feature |
|---|---|
Soh Boon Jun |
Search Pruning |
Melvin Tan Jit Chong |
Login and Multi User Access |
Sanjukta Saha |
Budgeting feature |
Jonathan Ng Hian Leong |
Skill and Skill Levels of people |
Summary of contributions
My contributions to the project are detailed below, covering aspects such as enhancement features, codes contributed and other forms of contributions.
-
Major enhancement: Created the ability to securely log into the application with a specific level of access to the application features associated with the login credentials
-
What it does: Allows you to login into the application with a specific role so that you are only able to access role-specific features within the application.
-
Justification: This feature improves the product in terms of security significantly because it prevents any random user who does not possess the correct login credentials to be able to access the application. Due to the fact that you can only log into the application with your relevant role, it prevents any unauthorized access to other features that are only accessible for other roles.
-
Highlights: This enhancement is first designed, taking into consideration the security and practicality aspects that are highly specific to NUSSU committee members, which is our target user group. Owing to the project time constraints, a simpler encryption algorithm, compared to traditional encryption algorithms which are stronger, is used. The current choice of the encryption methodology of login credentials ensures the security enhancement is still feasibly robust, yet does not demand an excess of time spent working on it.
-
-
Minor enhancement: Added the ability to create new accounts.
-
What it does: Allows you to create a new account so that you can log into the application securely.
-
Justification: This feature allows you to be able to create their own accounts so that you do not need to rely on the accounts of other users in order to log into the application.
-
-
Code contributed: [Link]
-
Other contributions:
-
Project management:
-
Set up issue tracker for the team repository
-
Set up organization directory and team repository on GitHub
-
Managed integration testing before every version release of product
-
-
Documentation:
-
Added value proposition and notable features sections in README. (#88)
-
-
Community:
-
Made non-trivial comments on team members' Pull Requests: #29, #80
-
Reported bugs and follow-ups in another team’s product. (#112, #123, #127)
-
Multi-user access level feature was utilized by the budgeting feature. (Link)
-
Renamed the product to "NUSSU-Connect"
-
Introduced a tool to enable team members to convert Asciidoc files to PDF format
-
-
Tools:
-
Set up continuous integration (CI) tools, Travis and Appveyor for the team repository
-
-
Contributions to the User Guide
In this section, you are introduced to two commands, namely the login and createaccount command. The login command allows you to log into the application with your own login credentials. The createaccount command allows you to create a new account with your own desired login credentials. You can expect a thorough walk-through detailing the steps to be taken in logging into the application and creating new accounts.
Given below are sections I contributed to the User Guide. They showcase my ability to write documentation targeting end-users. |
Logging into system: login
Logs into application using relevant credentials.
Format: login USERID PASSWORD ROLE
Examples:
-
login A1234567M zaq1xsw2cde3 president
Logs in with user ID as A1234567M, password as zaq1xsw2cde3 and role as president.
|
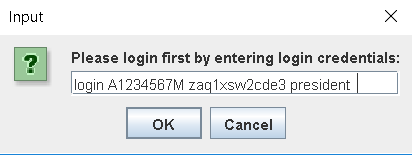
The default account login details for logging in when the application is launched for the very first time, can be illustrated in the picture below. You must enter the login details shown in the picture exactly, as all the login parameters are case-sensitive. Thus, any difference in casing between the actual and expected input characters will lead to failure in logging into the application. |
|
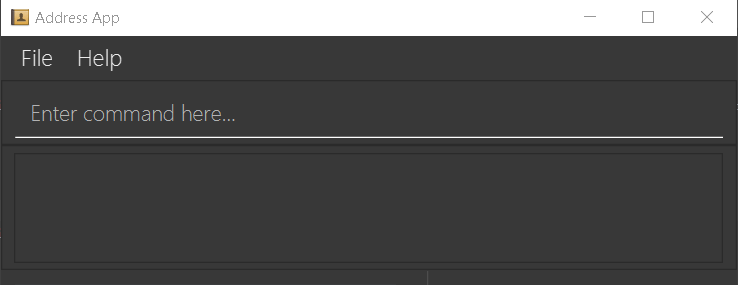
You should expect to see the main window of the application as shown below. |
|
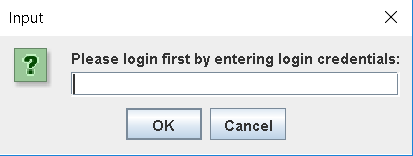
If you are unable to log in successfully, you should expect to see the login input field in a pop-up box again, asking you to input your login credentials again. |
|
User Id, Password and Role inputs are all case-sensitive! |
|
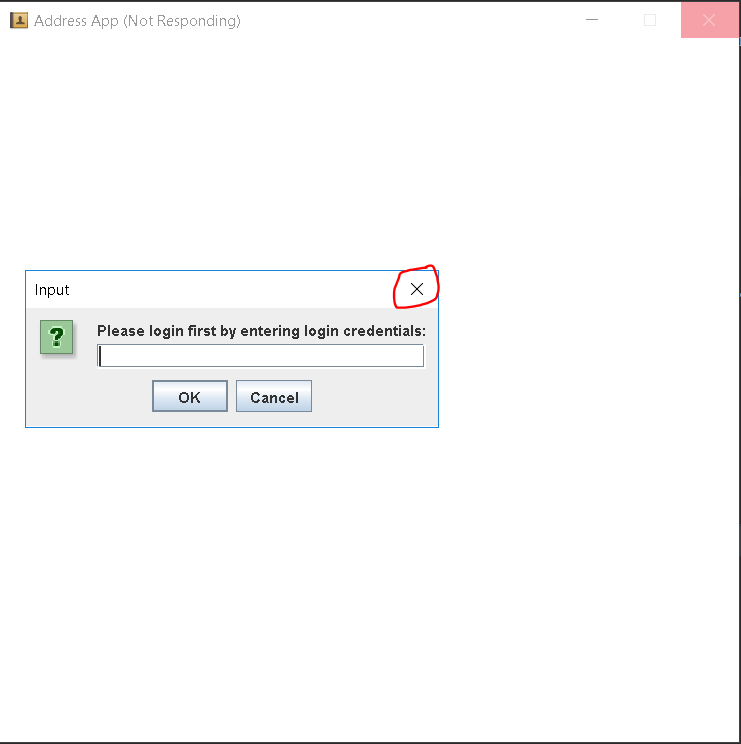
If you attempt to minimize the application before logging in to do other things, only to come back to the application later, and you want to close the application, you should not click on the cross button on the top right hand corner of the application, as shown in the image below. It is not recommended to close the application as shown in the image below, as this would cause the application to become unresponsive. You should switch windows repeatedly with the Alt + Tab keys on your keyboard until you can see the login dialog box shown in the image below. Once that is done, you can then safely click on the cross button found on the top right hand corner of the dialog box, circled in red, to close the application. |
Creating a new user account: createaccount
Creates a new user account in the NUSSU-Connect.
Format: createaccount USERID PASSWORD ROLE
Examples:
-
createaccount A1234569M zaq1xsw2cde3 member
Creates a new account with user ID as A1234569M, password as zaq1xsw2cde3 and role as member.
The image below shows the outcome of a successful creation of a new account.

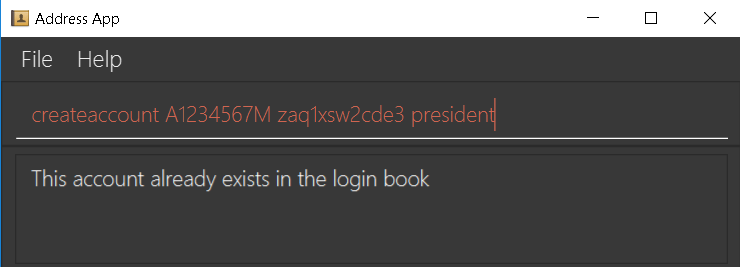
The image below shows an unsuccessful creation of a new account due to an account already existing.
Contributions to the Developer Guide
On a technical note, the following section aims to highlight the in-depth analysis and step-by-step technical explanation of the login command, from the start when you enter your login credentials, to the end when the application verifies your input credentials and either give or deny access to the application to you.
Given below are sections I contributed to the Developer Guide. They showcase my ability to write technical documentation and the technical depth of my contributions to the project. |
Login system feature
Current Implementation
The login mechanism utilizes an existing Java library, FilteredList, in order to filter out the relevant
account that is associated with an instance of a successful login. An object belonging to the FilteredList class, called
filteredLoginDetails, is instantiated at the start of the application. The filteredLoginDetails object initially
contains a complete list of all existing accounts stored in LoginBook. There is one crucial operation in FilteredList,
which is often used:
-
FilteredList#setPredicate(predicate)— Filters accounts infilteredLoginDetailsaccording to the predicates determined after the user inputs their login details.
ModelManager implements updateFilteredLoginDetailsList(Predicate<LoginDetails> predicate) and
getFilteredLoginDetailsList() found in the Model interface. getFilteredLoginDetailsList() is called when the
list of accounts in LoginBook is filtered to the extent where only one or no account remains in the list.
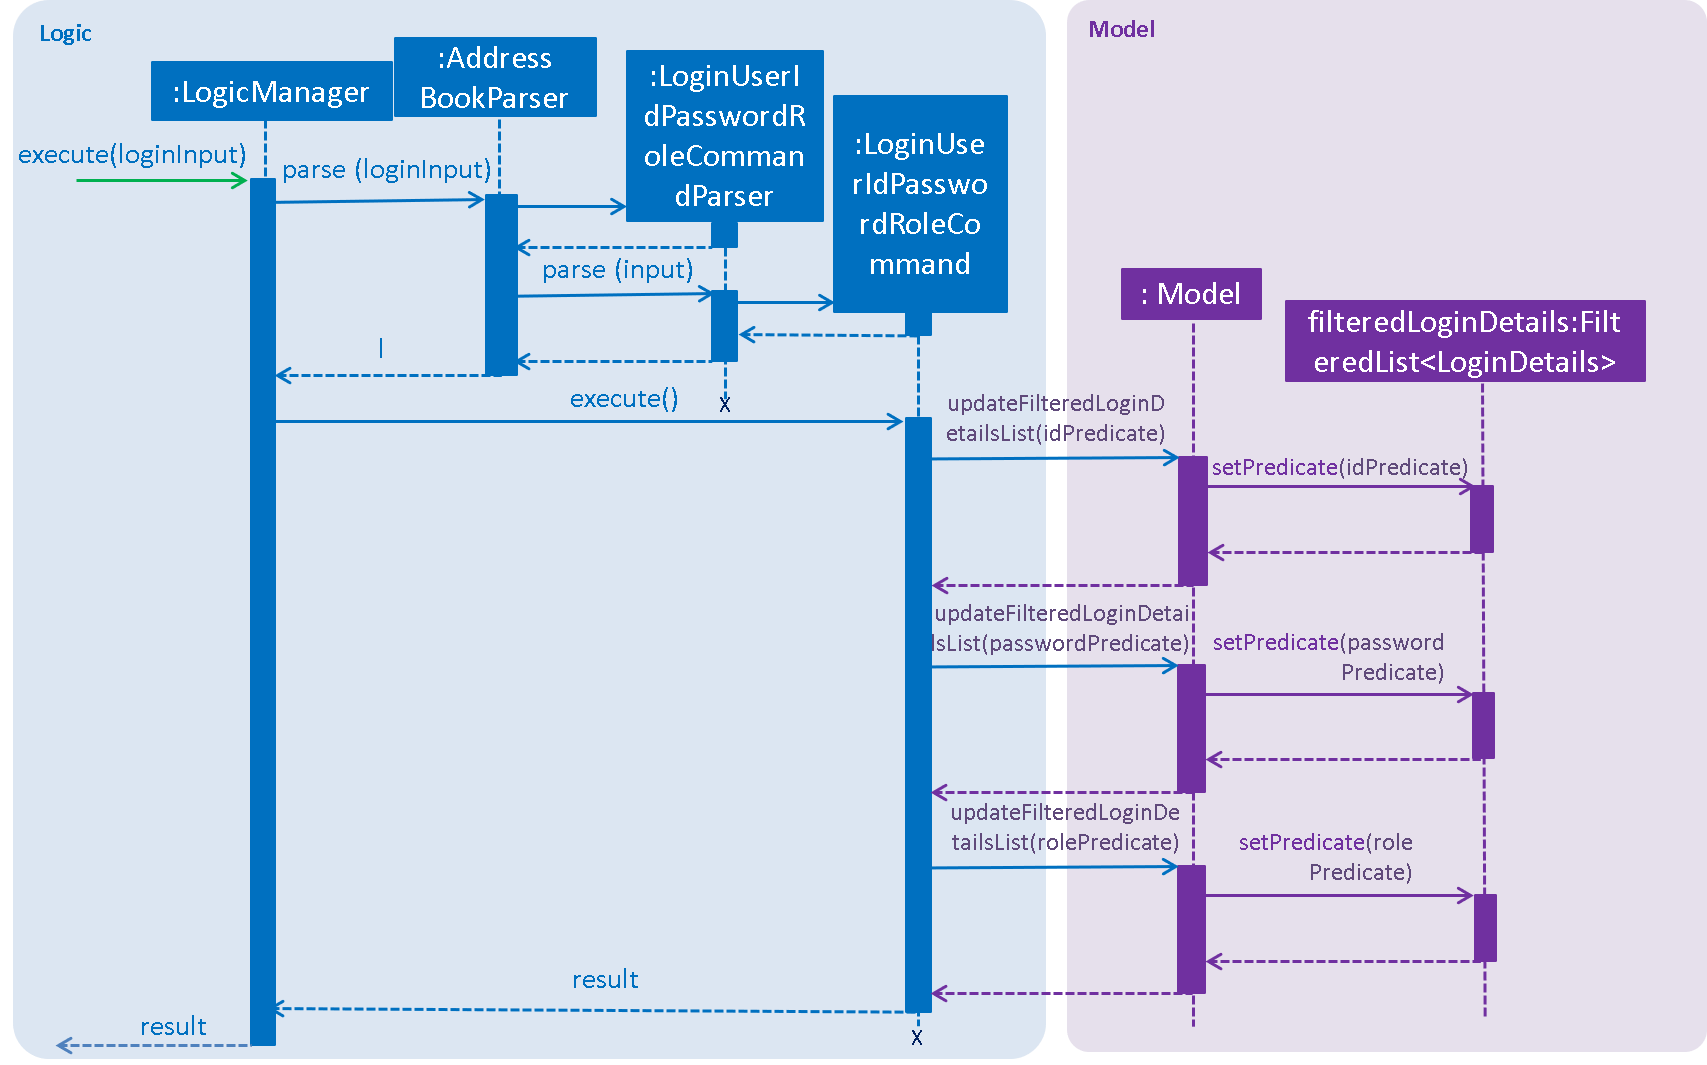
Given below is an example usage scenario and how the login mechanism behaves at each step. The sequence diagram below
demonstrates the flow of operation and interaction between the Logic and Model component in the login mechanism.
The diagram shows what happens when the user inputs the correct login details.
Step 1. You launch the application for the first time. The filteredLoginDetails object will be initialized with
a list of all the accounts in LoginBook.
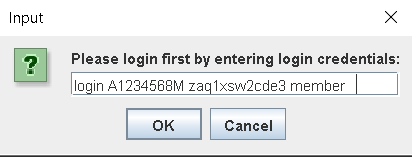
Step 2. You execute login A1234568M zaq1xsw2cde3 member command in the input box that matches an account in
LoginBook. LogicManager then calls ParseCommand(login A1234568M zaq1xsw2cde3 member) in AddressBookParser.
Step 3. AddressBookParser instantiates the LoginUserIdPasswordRoleCommandParser object and simultaneously calls the parse(args) method, returning
an LoginUserIdPasswordRoleCommand object with the user input, parsed, to AddressBookParser and LogicManager.
Step 4. LogicManager calls the execute() method in LoginUserIdPasswordRoleCommand. Next, LoginUserIdPasswordRoleCommand
calls updateFilteredLoginDetailsList(updatedIdPredicate) in Model with the computed predicate from user ID field input.
Step 5. Model calls setPredicate(updatedIdPredicate) in FilteredList, filtering accounts whose user Id is a
mismatch with updatedIdPredicate. filteredLoginDetails is updated as shown below.

Step 6. LoginUserIdPasswordRoleCommand calls updateFilteredLoginDetailsList(updatedPassPredicate) in Model with the
computed predicate from user password field input.
Step 7. Model calls setPredicate(updatedPasswordPredicate) in FilteredList, which then further filters out accounts
whose password is a mismatch with updatedPasswordPredicate. filteredLoginDetails is further updated as shown below.

Step 8. LoginUserIdPasswordRoleCommand calls updateFilteredLoginDetailsList(updatedRolePredicate) in Model with the
computed predicate from user role field input.
Step 9. Model calls setPredicate(updatedRolePredicate) in FilteredList, which then further filters out accounts
whose role is a mismatch with updatedRolePredicate. filteredLoginDetails is further updated as shown below.

| After step 9 is done, there should only be one account left in the list, assuming that the user input the correct login details. As the loginbook does not allow duplicate accounts with the same user ID field as another account, there should not be two or more accounts left in the list. |
In step 2, if you execute login A1234566M zaq1xsw2cde janitor command instead, the application will continue with steps
2 to 7, but instead of one account remaining at the end of the filtering process, there will be no account in the updated
list as shown in the image below.
|
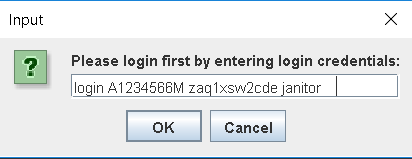

| In step 2, if you give a blank input for the login command instead, the application will throw a new ParseException and consider the login attempt as unsuccessful and initiate a new pop-up window asking you for input of login credentials again, as shown in the image below. |

| In step 2, if the input has either the id, password or role missing instead, the application will throw ParseException, consider the login attempt as unsuccessful and initiate a new pop-up window asking you for input of login credentials again, as shown in the image below. |
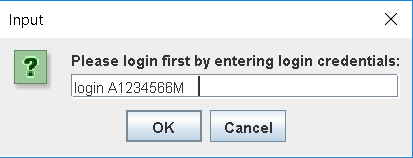
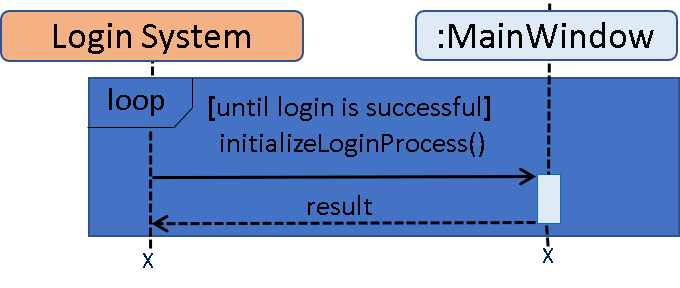
In all cases where you input either the wrong ID, password, or role, there will be no account left in the account list when getFilteredLoginDetailsList method in Model is called. The isLoginSuccessful boolean in LoginManager will be set to false via the setter method, setIsLoginSuccessful in LoginManager. This is done by the checkUpdatedAccountListSetLoginCondition method in LoginUserIdPasswordRoleCommand. The initializeLoginProcess method in MainWindow will be called repeatedly until isLoginSuccessful is set to true. The sequence diagram below shows the high level workflow of the login mechanism in the event of log-in failure.
The activity diagrams below shows the overall picture of how the login mechanism works.


Design Considerations
This section touches on the design considerations encountered during the project in the implementation of the login feature, different alternatives in different design aspects, and its advantages and disadvantages.
Aspect: How login data is stored
-
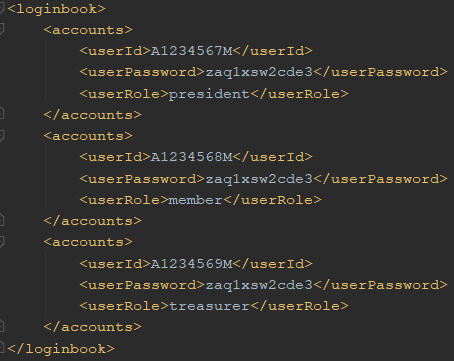
Alternative 1 (current choice): Saves login credentials in loginbook.xml in XML format.
-
Pros: Easier to read, and versioning is possible.
-
Cons: XML data file takes up more storage space.
-
-
Alternative 2: Saves login credentials using JSON.
-
Pros: Does not take up a lot of space.
-
Cons: Harder to read.
-
